Neck Safety and Yoga Inversions

Turning the World Safely Upside Down — The Safe Practice of Headstand and Shoulderstand Yoga Poses
Yoga inversions can be a joyful, empowering, perspective-altering experience. They require us to do things with our body that we might not have experienced since childhood. What makes yoga inversions so exciting is the fact we are using our arms and heads in ways we do not normally do. We can also make them high risk, leaving us susceptible to injury. Our necks, in particular, can bear the brunt of injuries in certain inversions.
To understand how to practice yoga inversions safely, let’s first discuss the anatomy of the neck.
Free Range
The neck, or cervical spine, is formed by seven vertebrae that stack on top of each other. The vertebrae form joints with the one above and below, and move by gliding on the joints. The neck has a forward curve known as lordosis. During development, the curve of the neck is formed when we started to lift our heads as infants.
The vertebrae are separated by a disc, which acts as a shock absorber and a pivot point for motion. The exception to this is there is no disc between the first and second vertebrae, which are shaped completely different than the other vertebrae of the spine. The second vertebra-also known as the axis vertebra-has a peg-like protrusion that fits into a hole in the first vertebra, also known as the atlas vertebra.
The cervical spine has a vast range of motion capable of rotation, flexion, extension, and side bending. It has the most motion of all the sections of the spine. This mobility means that stability is sacrificed. As the vertebrae move in relation to each other (gliding on the joints), the discs also move. As the cervical spine flexes forward, the discs move backward, and as the spine moves backward in extension the disc moves forward. The disc is full of a jelly like substance known as the nucleus pulposis, and if the outer fibers of the disc tear, the internal substance can be squished out resulting in what’s known as a disc herniation.
Top as Bottom
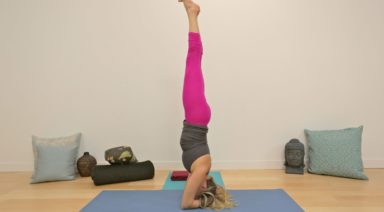
When we use our head as our foundation, instead of our feet, we need to recruit stability for an unstable surface. The architecture of our head and neck is such that it is made to float and move, not to bear weight. We need to support our neck and head when we go into poses like Sirsasana, or headstand.
Headstand can help us change our perspective, conquer the fear of inverting, and traditionally is thought to stimulate the pineal and pituitary glands, as well as tone the abdominal organs. There are many variations of headstand (tripod with head and palms on the floor; supported with head and forearms on the floor; and variations of head on the floor with finger tips out and arms extended).
The safest version of headstand is Salamba Sirsasana or supported headstand against a wall. Using the forearms on the mat allows us to recruit the strong muscles of the shoulder girdle and to create space for the neck. It also allows us to distribute our weight between the head and forearms.
Using a wall helps us to avoid awkwardly falling out of the posture. The most common way to injure our discs is when our neck is forced into flexion. This causes the disc to move backward, and if the fibers of the disc tear, the nucleus pulposis center can herniate out, causing irritation to the nearby nerves that exit the spine. These nerves supply the muscles and skin of the arms and hands, and, if injured, can result in months of painful recovery. Unsupported headstand, unfortunately, leaves us vulnerable to this type of injury.
Headstand is an advanced posture and should only be practiced under the supervision of an experienced teacher. Individuals with high blood pressure or ocular disorders should consult a health care practitioner familiar with yoga before proceeding.
Not a Neck Stand
Another common inversion is Sarvangasana or shoulder stand. Shoulderstand can be a great chest opener, a way to relieve swelling in the legs and is traditionally credited with stimulating the thyroid gland and abdominal organs.
Shoulderstand requires us to place the neck into a deep flexion. It is important that we support the cervical spine by allowing weight to rest on the fleshy part of our upper shoulders and back. We can improve this by rolling our shoulders under slightly to begin the pose, so that we are open across the collar bones and help maintain the lordotic curve of the neck.
To take some of the weight off of the neck and upper shoulders, we can practice Ardha Sarvangasana or half shoulderstand. In this version, we do not bring the feet all the way up to vertical, but allow the weight of the body to be well supported by the hands on the lower spine with the body and legs at approximately a 45 degree angle. It is important never to move the head around in the pose to avoid awkwardly weighting the neck.
Shoulderstand is an advanced posture and should only be practiced under the supervision of an experienced teacher. Like headstand, individuals with high blood pressure or ocular disorders should consult a health care practitioner familiar with yoga before proceeding.
The Joy of Limitation
Once we understand the anatomy and mechanics of our bodies, we are better able to practice yoga with respect for our limitations. Knowing what we are capable of and what our potential weaknesses are allows us to challenge ourselves in other ways and opens doors in our yoga practice we may never have thought to open. Embrace the many variations of yoga inversions and enjoy the view from down there.
Yoga Anatomy: Reducing Shoulder Impingement

![]()
![]()

Our wonderful shoulders are the most mobile joints in the body and, for anyone who has done any amount of Hatha Yoga flow, we can appreciate how much the shoulders are engaged and challenged in our practices. Given how frequently we load and stress the shoulders in yoga, it is ideal to move the shoulders with intelligence, mindfulness, and attentive care. One aspect of mindful movement and engagement is reducing the onset of shoulder impingement.
Our shoulder joints are made from a ‘ball and socket’ design. The upper arm bone (humerus) has defined structures at its proximal end (closest point to the center of the body). At the proximal end of the shaft, we see that the humerus has boney processes (called tubercles where tendons attach). Moving towards the shoulder joint, the humerus has a neck that transitions into a ‘head’ or the ball portion of the joint. The humeral head inserts into the socket (glenoid fossa or cavity) forming this highly moveable joint. The socket is part of the shoulder blade (scapula bone). There is another part of the shoulder blade with a boney projection called the acromion process which is positioned above the humerus. You call feel the acromion process on yourself by taking one hand over and to the back of the shoulder blade. Run your fingers along the shoulder blade to find a horizontal line of bone – this the spine of the scapula. Run your fingers all the way to the end into your shoulder – where this ends is your acromion process.
Between the acromion process and the tubercle region of the humerus is the ‘subacromial space.’ This is where our attention goes regarding shoulder impingement considerations. Deep above the spine of the scapula runs one of your rotator cuff muscles (supraspinatus muscle), which has its tendon traveling through the subacromial space and attaching onto the greater tubercle of the humerus. To offer some protection to this tendon, there is a small sac of fluid (bursa sac) between the tendon and the acromion process.
When we stand in Mountain pose (arms relaxed), there is ample space in the subacromial space for the supraspinatus tendon and the bursa sac. When we lift our upper arm bone outwards (abduction) or towards certain angles of significant forward movement (flexion), the humerus closes into the subacromial space. For some people, due to bone structure and reduced subacromial space, they are more prone to having the tendon and/or bursa sac being compressed and stressed (aka shoulder impingement). With frequent compression, the tendon and/or bursa sac may develop conditions of inflammation. As with any acute or chronic development of shoulder impingement conditions, you will want to consult a qualified health professional for proper assessment and therapeutic treatment.


