How to Improve Forward Fold with Better Flexibility
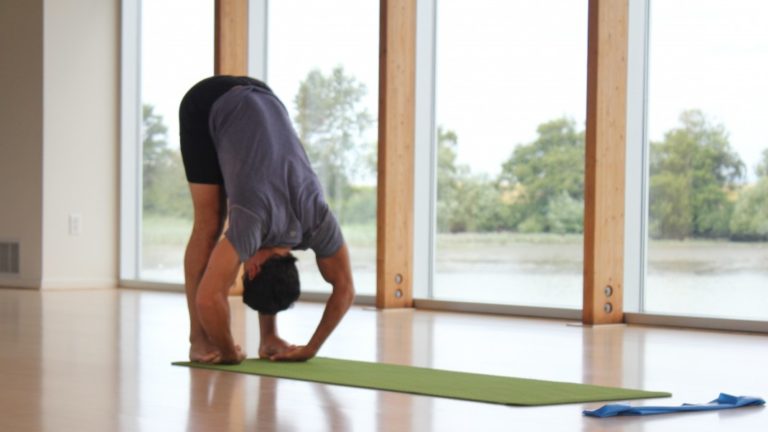
If I had a dollar for every time a yoga student or friend bemoaned his or her tight hamstrings, I would be pretty wealthy. It seems that people are super concerned about hamstring flexibility, and strain hard to touch their toes. Frankly, this ability is overrated.
Located on the back of the legs, the hamstrings are made up of three muscles with tendons that cross over both the knee and hip joints. Because the muscle attaches to two joints, any decreased joint mobility affects the length of the muscle.
Because of our sedentary culture, we spend an inordinate amount of time sitting — with both the knees and hips bent. This position directly impacts the length of the hamstrings. Athletic activities, such as running and biking, further shorten the hamstrings. This tightening also affects the pelvis because the tendons attach to the sit bones (ischial tuberosities), the bottom hooks of the pelvic bowl. In sitting, and even in standing, the shortening of the hamstrings can rock the pelvis backward, causing a rounded, slouchy position in the lower back. This rounded position can stress the back muscles, creating the potential for injury.
Now take this understanding of pelvic alignment and physiological length of the hamstrings onto the yoga mat, and move through a series of forward bends: the back muscles and tendons, attached to the sit bones, become genuinely cranky. Too often in yoga classes, students are most concerned with keeping their legs straight while trying to get their hands on the floor in a forward fold. Accomplishing this move really does not matter for general function and mobility, and can actually be injurious if done incorrectly. If a student strains to get their hands to the floor, and rounds at the pelvis, the lower back (and possibly the hamstring tendons) are at risk of becoming strained.
If the hamstrings are tight but the pelvis is allowed to tip forward as the student moves into a standing forward fold, the lower back is safe and, with time and practice, the student can work on gradually straightening their knees. The goal is to hinge at the hip, so that the lower belly moves toward the upper thighs. As long as pelvic mobility is not affected, and the core is engaged, a slight tightness in the hamstrings might offer some protection to less-flexible students by acting as a bumper pad to protect them from overstretching the connective tissue in their muscles and tendons.
Moving from the pelvis safely and successfully helps gain and maintain hamstring flexibility.
Complete this practice to help improve your forward fold with both pelvic mobility and hamstring flexibility:
- Start with cat/cow by going down on all fours. Focus on moving your pelvis by moving the sit bones up and down. Don’t dump into the lower back.
- Move into downward facing dog. Lift the sit bones up towards the ceiling, lifting the tendons of the hamstrings. Keep the pelvis in this position as you tuck the toes, lift the knees off the ground and gradually straighten the knees. Move into down dog gradually as you keep the pelvis stable, stopping when the knees can no longer straighten without rounding the back.
- If your hamstrings are really tight, place your hands on a chair and do the same cat/cow transition into a down dog. The focus should still be on lifting the tailbone.
- In down dog, place a block between your upper thighs and squeeze the inner thighs together. Try to straighten the knees, with the block in place, by pulling the lower belly in and lightly squeezing the sit bones. This movement activates the hamstrings, inner thighs and quadriceps (on the front thigh).
- Lie on your back, and place a strap, or a towel, around your foot and straighten the knee. Instead of pulling the foot closer to your head, keep the foot over the hip point and firm the front thigh muscle/quadricep to stretch the hamstrings. This alignment keeps the pelvis in a slight tilt and does not let the lower back round (as it would if you kept pulling the foot towards the head).
- Keep your abdominals engaged as you work on your pelvic mobility, on all fours or on your hands in down dog, so that you don’t dump into your lower back.
Completing this practice, and focusing on the pelvis instead of the hamstrings, may get you closer to the promised land of palms on the floor – or not. Remember, yoga is like life. It isn’t about the result; getting your palms down is much less important than how you move towards that goal.
Yoga for Beginners
The Yoga Sutras, transmitted thousands of years ago by Sanskrit scholar and teacher, Patanjali, are a collection of 196 aphorisms and instructions that serve as a map for exploring the Self: body, mind and consciousness. These sutras distill and collate the wisdom of Yoga, from earlier texts like the Vedas, Upanishads and the Bhagavad Gita, into four chapters, each with a specific purpose in liberating the practitioner from suffering. The Yoga Sutras were composed as succinctly as possible so they might be passed down orally from teacher to student until they were able to be recorded. The first chapter begins as follows:
Sutra 1.1: Atha Yoga Anushasanam
Atha: now, at this auspicious moment
Yoga: to yoke or integrate, union, refers to the practice of uniting the Self
Anu: within, following tradition
Shasanam: instruction, discipline, training
This first sutra implies with refined simplicity that in order to get to where you want to go, you must first begin where you are. Now begins the study of Yoga. Originally written for renunciants and spiritual aspirants, the term atha in the opening sutra also alludes to the devoted preparation that was required before entering into the sanctuary of practice.
For present-day “householders” however, with families, responsibilities and varying interests, I interpret this term to mean any moment of conscious choice when Yoga begins.
Beginner Defined
The word “beginner” in the context of Yoga has a number of different meanings. There is the beginner who is completely new to the practice, unfamiliar with physical movement modalities and somewhat disconnected from their physicality. There is the beginner who has never received instruction from a Yoga teacher, but has an intimate connection to their physical body and breath from participation in athletics or other disciplines. There is the beginner who can muscle their way into arm balances, but does so while holding their breath and the beginner who can readily touch their toes, but feels bored when they get there.
The difference between a beginner and an advanced practitioner is awareness and awareness has a tendency to ebb and flow.
As someone who has practiced for years, I am still a blissful beginner in many areas of the practice. Always, in all ways, learning.
What all beginners have in common is that Yoga receives us with enthusiasm no matter where we are on the path. Yoga is not an effort of seeking something outside ourselves, but one of integrating the fragmented pieces that we misinterpret as separate from consciousness.
Through embodiment, Yoga aims to unite breath, body and mind in the sanctum of the heart. Whichever shade of beginner you are, let that be enough.
The Full Picture
Of the 196 Yoga Sutras, only three refer specifically to physical practice or asana, a word meaning seat or posture. It is important to understand that Yoga is much more than asana and asana is much more than shapes, but for the purpose of this article, only the physical practice will be covered. Though asana is a worth entry point, we must acknowledge it as but a single piece of the yoga puzzle, only when we fit all of the pieces together do we experience the full picture.
The Structure: I’m in a Yoga Pose, Now What?
Obey the Breath Guru
For beginners, the mind has a tendency to commandeer the body during practice, leaving little opportunity to absorb new information from the breath. The misguided hierarchy that puts the mind in charge can stunt our growth in practice, keeping us fixed in habits, patterns and physical states. The will of mind can force the body into submission whereas the breath illuminates internal awareness. Surrender your attention to the breath, it will keep you grounded in the present moment.
Without interference from the mind, the breath is free to inform the anatomical structure of the asana. This is what Krishnamacharya, the grandfather of modern postural Yoga practice, refers to as the breath guru, a teacher to obey with devotion above all others. As you begin exploring new postures, look for changes in the breath. When you feel the breath becomes obstructed, it might be gently advising you to shift and change something. Conversely, a smooth, steady breath rhythm, especially while exerting effort, is generally an indication of internal alignment.
These subtle, breath-centric adjustments are the self-correcting principle of conscious Yoga asana and they sustain the receptivity of the practice.
Regarding the mechanics of breath for beginners, asanas should be practiced while breathing in and out through the nose with samavrtti pranayama, meaning the inhale and exhale are of equal length and the breath is expanding. Should the physical practice become so taxing as to require open-mouth breathing, enjoy rest until the breath rhythm is normalized.
Movement Versus Action
In the context of Yoga asana, movements orient the spine and limbs in space relative to the major planes and axes of the body. A movement describes an external spatial relationship. Actions, on the other hand, are localized efforts that produce activation or relaxation in a specific part of the body. Actions describe precise, focused refinements of internal alignment.
Bandhas: Harness Vital Energy
Bandha, meaning lock, refers to the focused action within a Yoga posture wherein certain muscles are contracted to manipulate and contain the flow of life-force energy, Prana. Proper activation of bandhas is integral to physical practice. These energy “locks” stabilize and strengthen the primary structures of the body to awaken instinctual muscle intelligence. As a concept however, “energy locking” can be somewhat foreign and difficult to communicate without an experiential basis in breath-guided movement. For beginners, bandhas might be best described as follows:
- Mulabandha (root lock) is the deep muscle contraction of the perineum or bathroom muscles that firms the base of the spine. This bandha supports the upward flow of energy and may be maintained throughout the entire practice with the exception of savasana, the final resting posture
- Uddiyanabandha (flying up lock) is performed on an empty stomach by drawing the low belly and navel up and in toward the spine which lifts the abdominal organs and stretches the diaphragm. Uddiyanabandha is commonly misunderstood because it can only be experienced fully when the breath is held out after the exhale and requires skillful manipulation of the breath. The full expression of this bandha is not advised for beginners, however, similar actions can be practiced without holding the breath — gathering energy in the low belly and hugging navel up and into spine to cinch at the waist. These actions stabilize the lumbar spine and pelvis while stimulating the upward flow of energy which can lighten the load of the limbs in weight-bearing postures. Note: this bandha is contraindicated for pregnancy, menstruation, high blood pressure, glaucoma and heart disease
- Jalandharabandha (throat lock) moves the chin toward the chest and is often practiced with specific breathing techniques and asanas where the cervical spine is in flexion. This bandha improves circulation by stimulating the major arteries in the neck and with gentle compression to the thyroid, it can help regulate metabolism function
Drishti: Window to the Inner State
Drishti refers to the direction of the gaze in a Yoga posture. Some disciplines prescribe a specific drishti for each posture, toward the nose or the navel for example, but for beginners it can be helpful to steady the eyes on the earth or straight ahead to provide internal stability and avoid strain. Wherever you choose to look, invite your gaze to be related to the heart, avoid the tendency to move the gaze beyond the heart which can create stress in the strong, but delicate bones of the cervical spine.
The gaze is a window to the inner state: let it reflect the glow of tejas, the inner fire.
B.K.S. Iyengar recommends keeping the eyes open until you feel connected enough to your physical alignment and are able to intuitively adjust as needed. When the eyes are opened, the gaze should be focused and alert while allowing the muscles around the eyes to remain soft. When closed, let the eyelids rest and the eyes relax into their sockets.
The Sadhana: Guidance for Daily Practice
Principles of Yoga Asana
As a student of Yoga, I am blessed to have had the opportunity to learn from Mark Whitwell, a student himself in the direct lineage of Krishnamacharya and author of The Promise. While in Sedona, gathered in satsang, a spiritual discourse or study, I sat utterly captivated among a community of yogis as we listened to him speak. During my first experience, I vividly remember an internal lightbulb turning on when he delivered with candor and austerity, the transmission of his teacher’s principles as if he were reciting the alphabet. Which is not to detract from their perennial wisdom, but to illustrate their absolute truth. My personal sadhana (practice) was transformed in that moment and for that, I am deeply grateful. What follows are my notes from that talk and what landed for me, my hope is that they might illuminate something new for you.
- The breath movement is the body movement. The body movement is not faster or slower than the breath rhythm, do not move on top of the breath, instead receive it from within as though you are being breathed (you are!)
- The inhale is from above as receptivity (female, Shakti), the exhale is from below as strength (male, Shiva). This union of polarities within the body is the essence of Hatha Yoga. Ha, meaning sun and tha, meaning moon. Every conscious breath exchange moves us toward balance
- Breath envelopes the movement. Each inhale and exhale precedes and continues beyond the body movement such that the breath encapsulates the practice
- Body, breath and bandha are a seamless process. When the breath is unobstructed, it informs focused, self-correcting effort in asana which in turn activates bandha and ultimately harmonizes intelligent muscle cooperation
- Asana, pranayama and meditation are a seamless design. Asana creates the conditions for pranayama (breath expansion) and pranayama creates the conditions for meditation. The intimate experience of reality in which all 3 merge into a singular experience of presence is Yoga. Meditation flows as a consequence or better yet, a gift, of asana and pranayama
Function Precedes Form
Your back is a gateway to the sky.
The celestial dance,
The story of space and time,
Is coded in the spine.::Lorin Roche, Radiance Sutras
With the evolution of modern Yoga styles that sometimes innocuously emphasize the form of physical shapes to yield a particular function, it can be easy to forget that function has always preceded form.
The asanas and techniques that we explore in Yoga classes today, though they may appear form-based on the surface, are deeply rooted in the practical functions for which they were originally developed.
These functions were primarily aimed at improving postural alignment for a healthy spine; the spine was considered to be the source of vitality. For this reason, asanas were classified based on the movement of the spine which we will explore in the next section.
Beginner Yoga Poses
Rather than simply identifying appropriate poses for beginners based on form alone, the remainder of this article aims to present such beginner yoga poses in the context of function, spinal movement and key actions. In addition to the general guidelines provided, you may choose to click on the pose names to view detailed instructions and alignment specific to each posture. Approach these poses not as physical shapes to be conquered or mastered, but as an invitation to observe, gather information and cultivate a deeper connection to the layered Self, with a capital “S.”
The poses listed in each category below are not intended to be practiced as a sequence, but rather to provide an entry point for understanding the basic functions of asana. For a series of intelligently sequenced home practices for beginners, I encourage you to explore Rodney Yee’s Beginner Yoga Series.
Explore the different categories of Yoga Asana below.
Samasthitihi: Equal/Balanced Steadiness
Samasthitihi is quality or reference point evoked in various postures, it is a state of balance and alignment in the natural curves of the spine. Spinal Movement: The spine is in a neutral position relative to the pelvis, crown, shoulders, hips and heels are in a single line like a staff or danda.
Key Actions
- Engage the quadriceps to lift the knee caps
- Wrap the inner thighs toward the back of the body to broaden the sacrum (the triangular bone of fused sacral vertebrae at the base of the spine)
- To balance the anterior tilt of the pelvis, move the tailbone toward the inner heels, without tucking, until the pelvis is neutral
- Firm around the sitting bones (the insertion point of the hamstrings)
- Activate mulabandha and hug navel to spine
Beginner Poses
Paschimatana: Intense Westward Stretching (Forward Bends)
Forward bends soothe the central nervous system and improve spinal circulation while stretching the back of the torso and heart. This unseen side of the physical body symbolizes the west in Yoga because the physical practice was generally done facing the rising sun, to the east. In bringing awareness to the westward facing side, forward bends lend themselves well to deep personal reflection in response to the inward pull of energy.
Spinal Movement
Forward bending moves the torso in the sagittal plane (the plane dividing the body into right and left) toward the anterior side of the legs. This movement is sometimes referred to as spinal flexion, however an important distinction can be made between hip flexion and spinal flexion. In spinal flexion, the back rounds, shortening the distance between vertebral bones along the front of the spine while lengthening the distance along the back. Conversely, hip flexion maintains a neutral spine and employs hinging at the hips to bring the torso closer to the front of the legs.
It is generally advised to avoid spinal flexion for conditions like osteoporosis, disc herniation and hamstring injury. As an alternative, forward bending can still be enjoyed safely by most populations when flexing only at the hips and maintaining a neutral spine by navigating the pelvic tilt (discussed below). In later stages of practice, some practitioners may benefit from entering forward bends by first flexing at the hips to orient the torso relative to the legs, then gently rounding the spine to massage the internal organs and create space in the musculature of the back.
Key Actions
- Anterior tilt of the pelvis, moves the pubic bone toward the tailbone
- Engage the quadriceps to lift the knee caps
- Wrap the inner thighs toward the back of the body to broaden the sacrum
- Hug the shins energetically toward the midline
- Maintain a neutral position of the ankles by activating the muscles of the feet and pressing the soles of the feet evenly away or into the earth for standing forward bends
- Relax the neck while gently bringing the chin toward the chest without restricting the breath
- Avoid strain in the shoulders by releasing the crown as a natural extension of the spine
- Mulabandha remains activated
Beginner Poses
- Uttanasana, Standing Forward Bend with blocks under hands, gently bent knees
- Paschimottanasana, Seated Forward Bend (*Note: If tilting the pelvis is not available in seated forward bends, consider propping the hips up onto a blanket or bolster)
- Marjaryasana, Cat Pose
Purvatana: Intense Eastward Stretching (Backbends)
Backbends invigorate the central nervous system while increasing body heat and heart rate. These postures lengthen the spine and liberate the diaphragm which can improve the quality of the breath and improve posture. Opening the front side of the body, which represents the east, backbends inspire courage and stimulate heart opening.
Spinal Movement
Backbending involves spinal extension which moves the torso in the sagittal plane away from the front of the legs. This movement increases the distance along the frontline of the body between the base of the spine and the crown. Some postures in this category involve moving only the torso or the legs, while others invite whole body movement.
Key Actions
Relax the groins to allow the inner thighs to move toward the back of the body (this broadens the sacrum to make space for the tailbone without compressing the lower back) Move the tailbone toward the pubic bone. Note: this action and the previous action are opposing and should be experimented with until you can experience both spaciousness in the low back and opening in the hip flexors Energize the legs by extending from hips to toes lifting knee caps Keep the legs parallel with knees facing the same direction, energetically hug legs to the midline Gently firm the sitting bones and engage the glutes. Note: engaging the glutes will generally tend to externally rotate the hips opposing the previous action, again experiment by alternating these actions to find balance Be gentle with the cervical spine taking care not to compress the back of the neck Only lift the gaze to the extent that the back of the neck can stay long and breath can flow freely Oscillate the neck as needed to refrain from hardening
Beginner Poses
- Salamba Bhujangasana, Supported Cobra/Sphinx Pose
- Anahatasana, Heart Chakra Pose/Puppy Pose
- Ardha Purvottanasana, Upward Facing Table
Parsva: Side, Flank, Lateral
Lateral bends open the side channels of the body and can help restore proper alignment of the vertebral column by strengthening erector spinae muscles that support either side of the spine. This, in effect, can alleviate pain related to hip misalignment resulting from lateral imbalance. Postures in this category energize by expanding the ribcage and increasing the space available for the lunges to inflate.
Spinal Movement
Poses in this category laterally bend the spine by moving the torso in the frontal plane (the plane dividing the body into front and back) to decrease the space between vertebrae on one side and increase on the other.
Key Actions
- Lengthen both sides of the waist evenly, to avoid compression in the side not receiving the opening
- Keep the torso in the the frontal plane of the body by stacking the shoulders to avoid rotation the spine
- The tendency is to bring the top ribs forward and let the bottom ribs drop back, keep them level.
- Maintain activation in the core to stabilize the torso
- Option to take the arm on the side receiving the opening overhead as available, palm turns toward the face
Beginner Poses
- Parighasana, Gate Pose
- Utthita Trikonasana, Extended Triangle Pose with block under bottom hand
- Utthita Parsvakonasana, Extended Side Angle Pose with same forearm to front thigh
Parivrtti: Revolved, Turned Around (Twists)
Twisting postures neutralize the central nervous system and serve as pratikriyasana, balancing counterposes, to backbends. Revolving the spine can recalibrate the alignment of vertebrae and leave the body feeling renewed. The muscular actions in twisting can increase circulation of cerebrospinal fluid and improve mobility by stimulating the deepest layers of fascia, closest to the spine.
Twisting can also support the body’s natural cleansing process as a result of what B.K.S. Iyengar calls the “squeeze and soak” effect, referring to the massage and subsequent rinsing of abdominal organs upon entering and exiting a twist. When the twist is activated, organs are compressed and waste is flushed out. As the spine returns to neutral, a surge of oxygenated blood returns to nourish the system.
Spinal Movement
Twisting moves the torso in the transverse plane (the plane dividing the body into upper and lower halves) rotating the spine about its vertical axis. Some revolved postures involve twisting the torso while the lower body remains stable, others rotate the lower body while stabilizing the torso and some twists rotate the torso and legs in opposite directions.
Key Actions
- Lengthen the spine prior to rotating, maintain upward energy from the base of the spine to crown
- Limit strain in the sacroiliac joints by moving pelvis and sacrum together, avoid “anchoring” the pelvis which can displace the sacrum relative to the hip bones
- Draw navel to spine to activate core muscles
- Move the spine into the body to elevate the heart
- Press the shoulder blades onto the back
- Envision the side of the torso opposite the direction of the twist giving energy while the other side receives
- Let the eyes be the last to arrive and the first to exit the twist to avoid strain in the most flexible curve of the spine
Beginner Poses
- Supta Jathara Parivartanasana, Reclined Revolved Abdomen Pose
- Ardha Matsyendrasana, Half Lord of the Fishes Pose variation with bottom leg extended, hug opposite knee in lieu of hooking elbow
- Parivrtta Prasarita Padottanasana, Revolved Wide-Legged Forward Bend with one hand on block, one hand to sacrum or reaching up
Viparita: Inverted, Reversed (Inversions)
Inversions reverse the downward gravitational pull on the body and stimulate circulation by inverting the position of the legs to increase blood flow to the heart. With the reduced effect of gravity on the organs, digestion and elimination are often improved. Poses in this category can also alleviate spinal stiffness and improve mental clarity and hormonal balance.
Spinal Movement
Inversions are poses that move the crown of the head below the heart or the legs above the heart, reversing the effects of gravity on the spine and in most instances also reversing the top to bottom orientation of the vertical axis. For most inverted postures, the balanced samastitihi alignment of the spine (with crown, shoulders, hips and heels in a line) is preserved while the orientation of the spinal column shifts.
Key Actions
- Invoke the key spinal actions of Samastitihi
- Maintain even, steady breath
- Activate the legs and move tailbone toward inner heels
- Keep the neck long and spacious, shoulders away from ears
- Press shoulder blades onto back
- Integrate the shoulders by hugging the heads of arm bones into joints
Beginner Yoga Poses
- Adho Mukha Svanasana, Downward Facing Dog
- Salamba Sarvangasana, Supported Shoulderstand with hands, a block or bolster under sacrum
- Viparita Karani, Legs up the Wall, bring hips to the wall and extend legs vertically up, relax torso
Visesa: Special (arm balances, core cultivation, other)
The final asana category below includes postures that are distinguished primarily by unique actions and alignment to serve their purposes. The spinal movement in these poses can generally be described by one or more of the categories listed above, however it is not typically the basis of the pose function. For example, the beginner yoga poses listed below invoke samastitihi in the spine, which supports the unique key action also listed.
Beginner Yoga Poses
- Vasisthasana, Side Plank Pose with top foot down for support – hand balancing
- Vrksasana, Tree Pose — standing external rotation of the hip while balancing
- Navasana, Boat Pose — concentrated core cultivation

